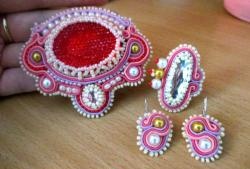
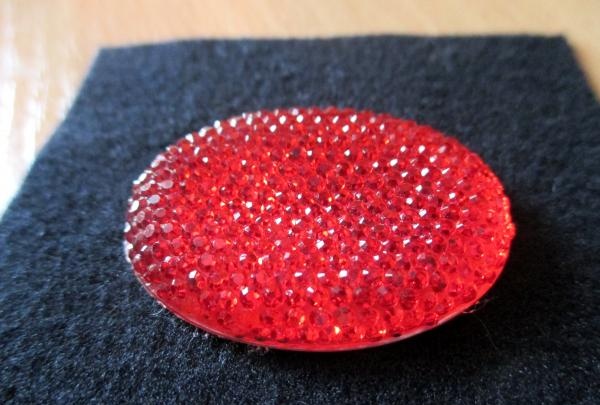
To make a brooch you need:
- oval cabochon;
- beads of three colors (red, beige and pearl);
- soutache 3 colors (pink, raspberry and light lilac);
- sew-on oval rhinestone;
- glossy beads 4 pcs. two colors (gold and mother-of-pearl);
- large beads - 19 pcs.;
- cardboard, felt and leatherette, pieces of 15 cm;
- needle, isothread (or fishing line), scissors, Moment glue, pin.
Let's get started:
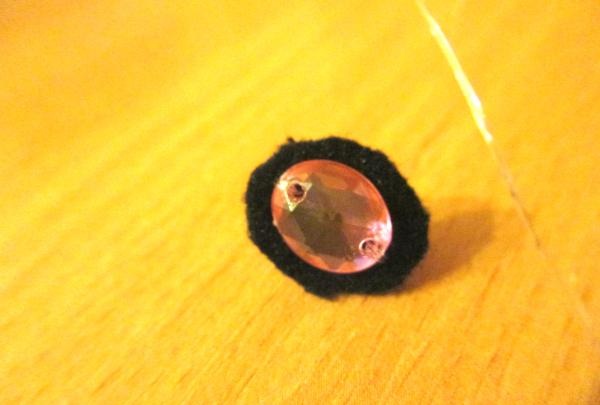
1. Sheathing the cabochon.
Glue the stone to the felt.
![Glue the stone to the felt](https://i.washerhouse.com/images/10/1889-prikleivaem-kamen-k-fetru.jpg)
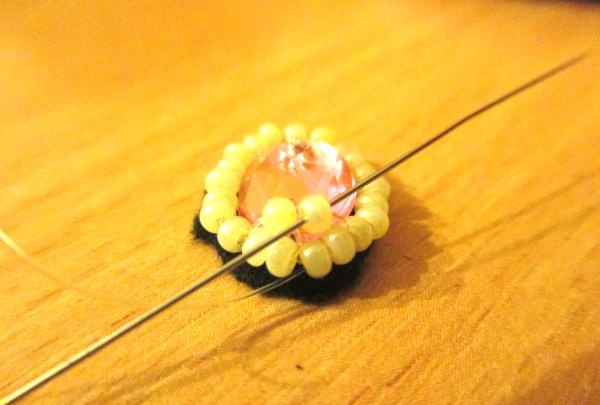
We take the beads and start sewing them in a circle. To begin with, we thread three beads, and then add one each time. The needle must be returned every two previous beads. Only then will the beads stop dancing.
![thread three beads](https://i.washerhouse.com/images/10/1890-vdevaem-tri-biseriny.jpg)
![add one at a time](https://i.washerhouse.com/images/10/1891-dobavlyaem-po-odnoy.jpg)
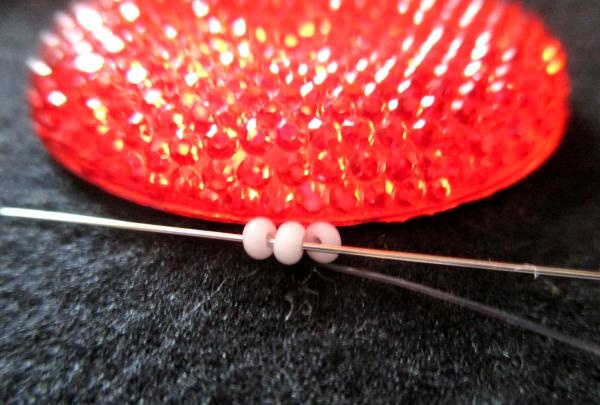
Here's the wrong side.
![wrong side](https://i.washerhouse.com/images/10/1892-iznanochnaya-storona.jpg)
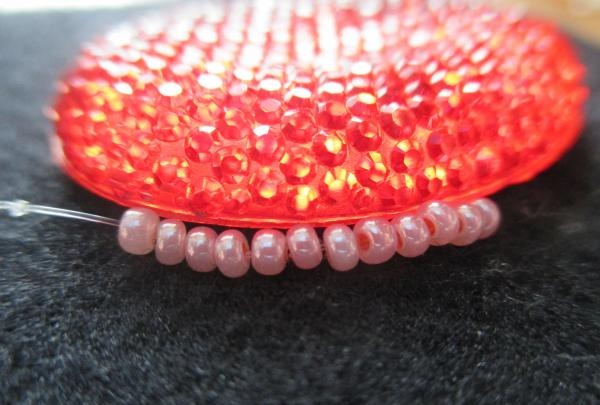
We make the second row in a herringbone pattern with every 4 beads.
![We perform the second row](https://i.washerhouse.com/images/10/1893-vtoroy-ryad-vypolnyaem.jpg)
![We perform the second row](https://i.washerhouse.com/images/10/1894-vtoroy-ryad-vypolnyaem.jpg)
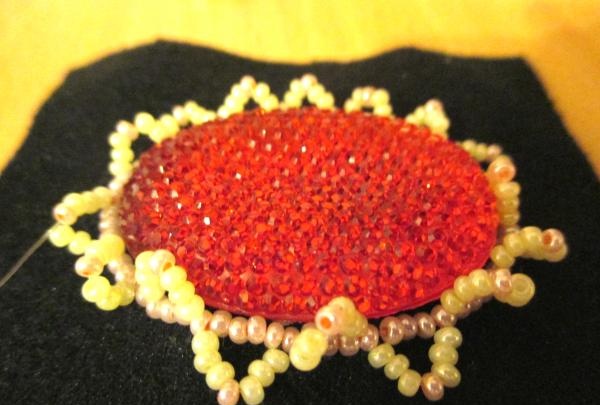
Third row: string the middle herringbone beads and thread 3 beads. So, we carry out until the last bead and in conclusion, we go through the entire row again. We tighten the stone.
![We tighten the stone](https://i.washerhouse.com/images/10/1895-zatyagivaem-kamen.jpg)
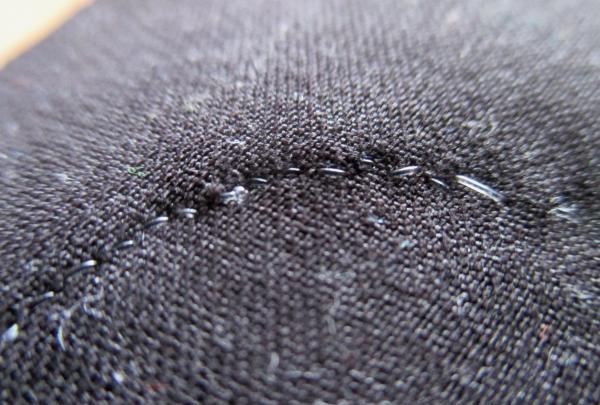
We form two adjacent knots. We cut the line.
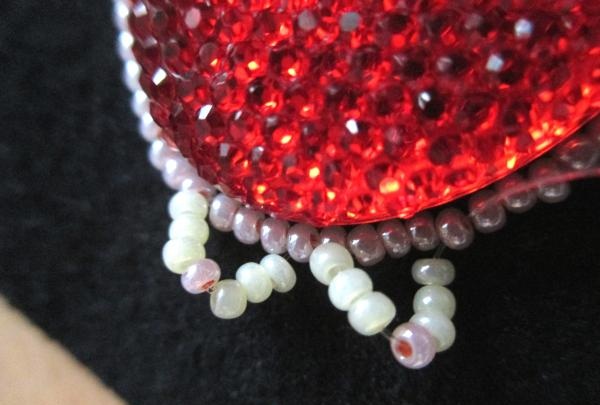
2. First curls with soutache.
- We cut off the excess felt and start working with soutache.
![Let's start working with soutache](https://i.washerhouse.com/images/10/1896-nachinaem-rabotu-s-sutazhom.jpg)
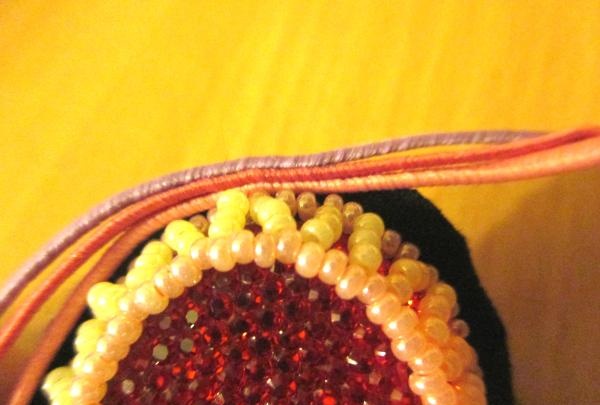
To do this, we decide on the middle and begin to sew the cord at the bottom.
![sew the cord at the bottom](https://i.washerhouse.com/images/10/1897-prishivat-shnur-vnizu.jpg)
![sew the cord at the bottom](https://i.washerhouse.com/images/10/1898-prishivat-shnur-vnizu.jpg)
We try to insert the needle correctly so that the product turns out even.
![We try to insert the needle](https://i.washerhouse.com/images/10/1899-staraemsya-vvodit-iglu.jpg)
![We try to insert the needle](https://i.washerhouse.com/images/10/1900-staraemsya-vvodit-iglu.jpg)
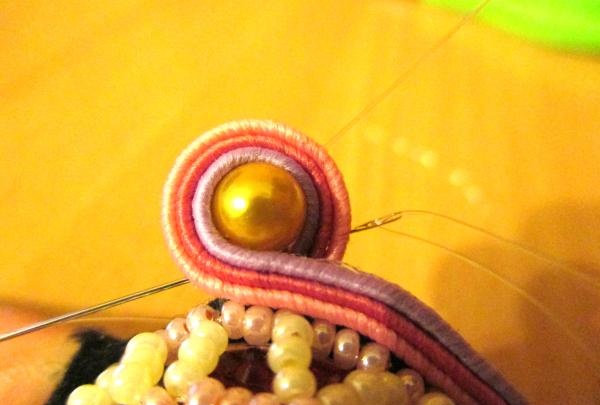
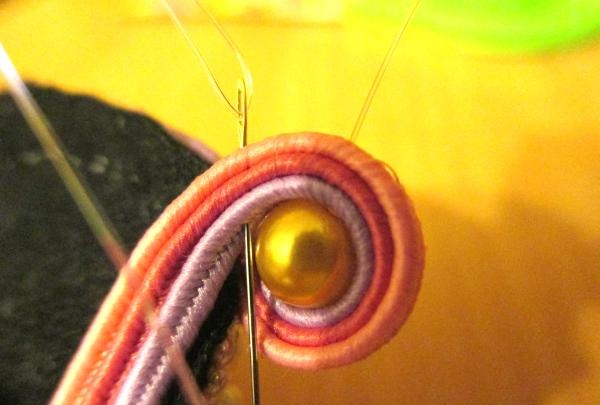
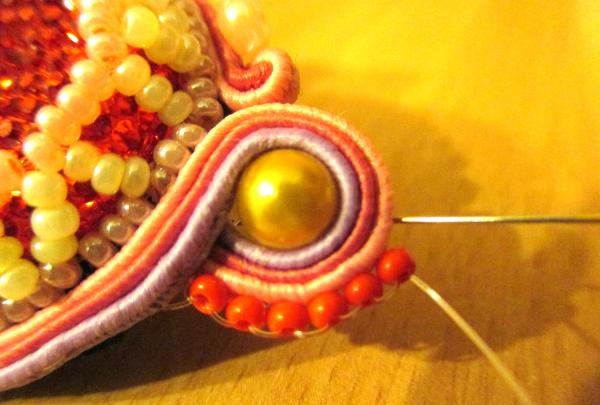
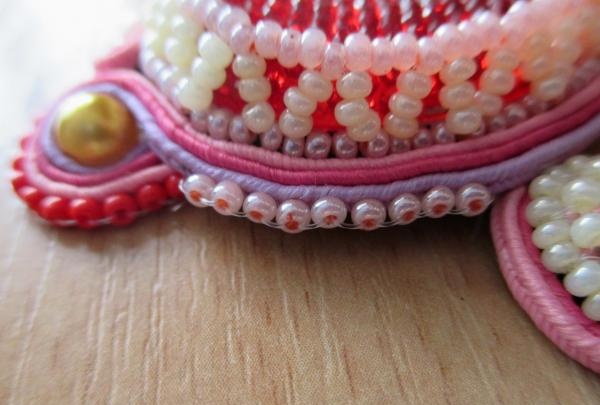
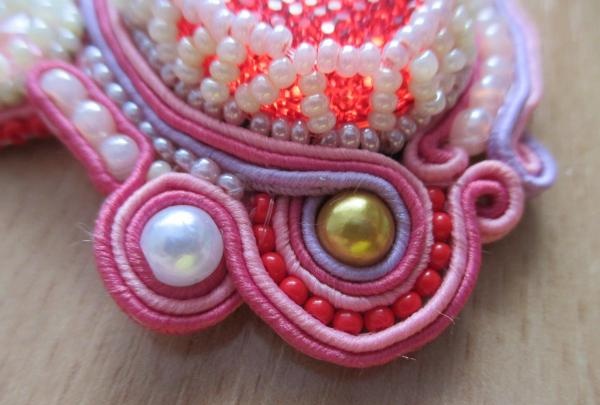
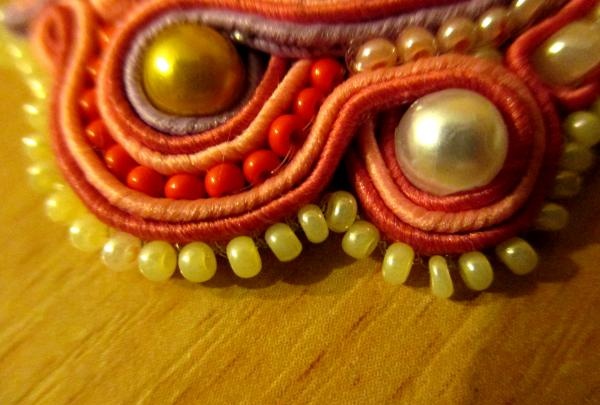
On the sides of the brooch we form curls with gold beads. We firmly fix the soutache to the felt with fishing line. We cut the cord and singe the ends.
![singe the ends](https://i.washerhouse.com/images/10/1901-konchiki-podpalivaem.jpg)
![singe the ends](https://i.washerhouse.com/images/10/1902-konchiki-podpalivaem.jpg)
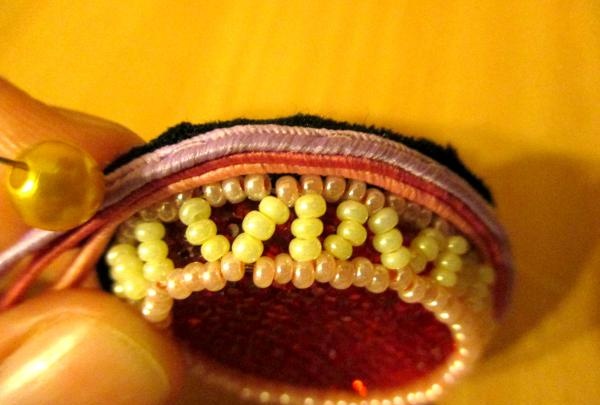
- We trim the top edge of the stone in the same way, but we don’t use beads.
![use beads](https://i.washerhouse.com/images/10/1903-ispolzuem-businy.jpg)
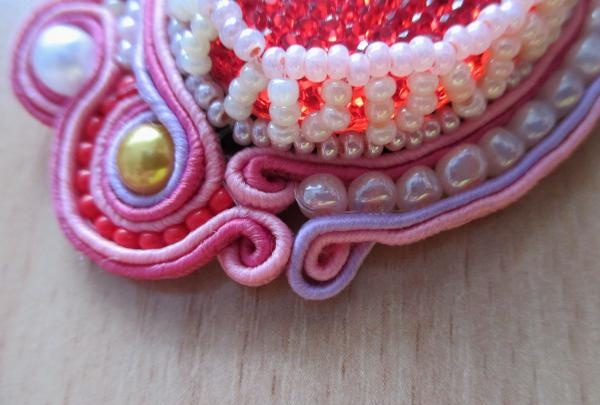
3. Take large beads - 13 pcs. And we firmly sew it to the rows of soutache.
![sew it to the rows](https://i.washerhouse.com/images/10/1904-prishivaem-ego-k-ryadam.jpg)
4. Take small red beads and make the next row encircling the side beads.
![encircling side beads](https://i.washerhouse.com/images/10/1905-opoyasyvayuschiy-bokovye-biseriny.jpg)
![encircling side beads](https://i.washerhouse.com/images/10/1906-opoyasyvayuschiy-bokovye-biseriny.jpg)
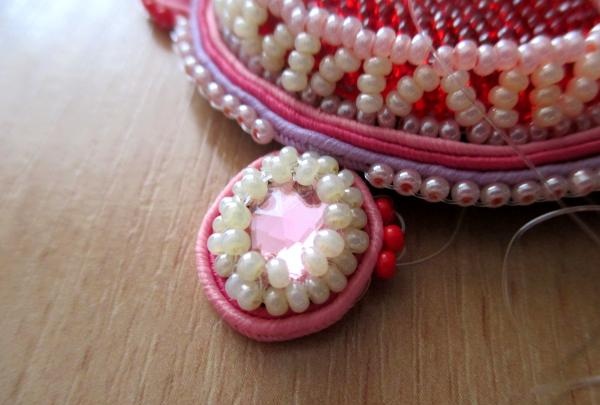
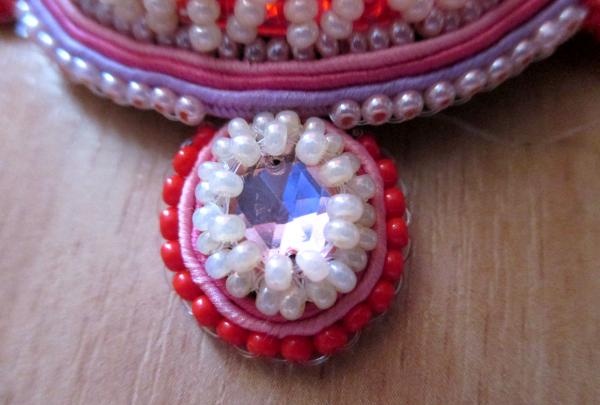
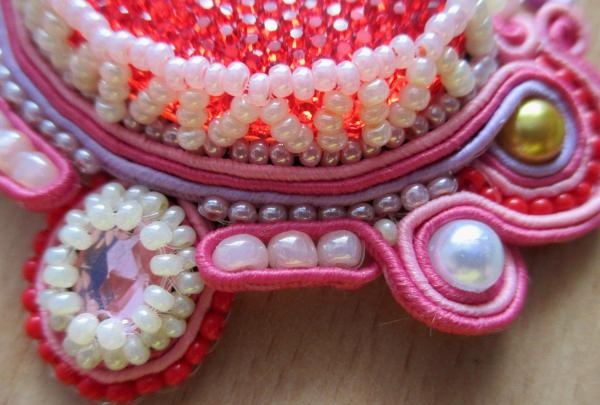
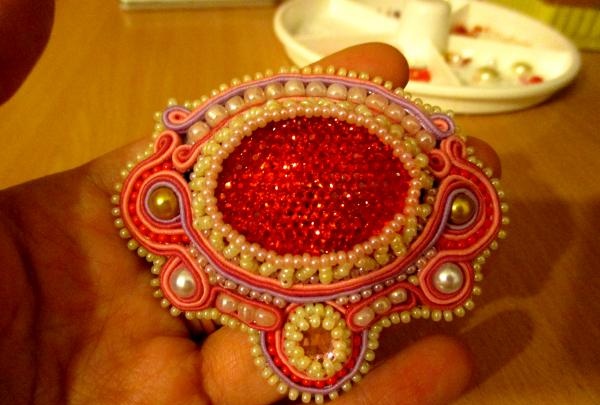
5. Let's start working with rhinestones. We sew it to the felt and braid it with beads.
![Sew it to the felt](https://i.washerhouse.com/images/10/1907-prishivaem-ee-k-fetru.jpg)
![Sew it to the felt](https://i.washerhouse.com/images/10/1908-prishivaem-ee-k-fetru.jpg)
We make a row with pink and raspberry soutache.
![We carry out a series](https://i.washerhouse.com/images/10/1909-vypolnyaem-ryad.jpg)
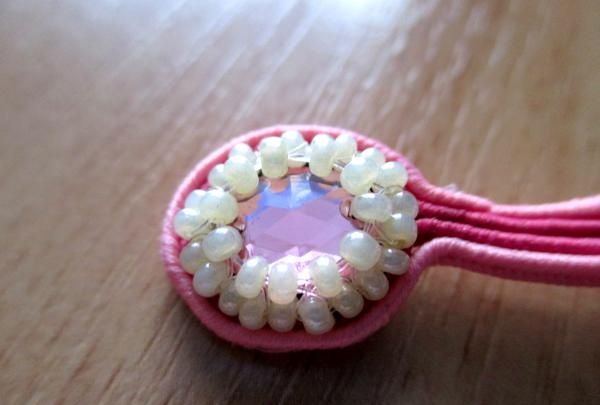
We sew the element to the bottom of the product, exactly in the middle.
![Sew the element to the bottom of the product](https://i.washerhouse.com/images/10/1910-prishivaem-element-knizu-izdeliya.jpg)
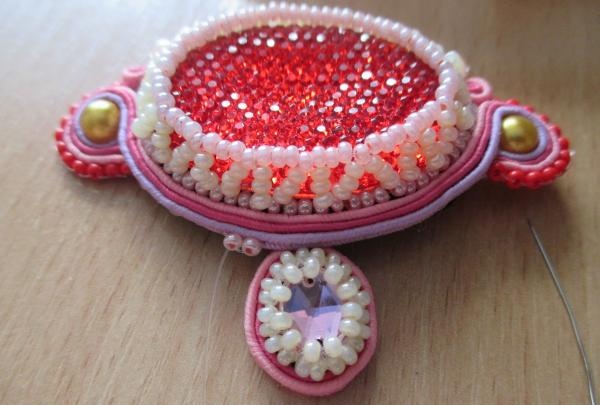
6. Sew a row of beads between the middle beads and the rhinestone.
![Sew on a row of beads](https://i.washerhouse.com/images/10/1911-prishivaem-ryad-s-biserom.jpg)
![Sew on a row of beads](https://i.washerhouse.com/images/10/1912-prishivaem-ryad-s-biserom.jpg)
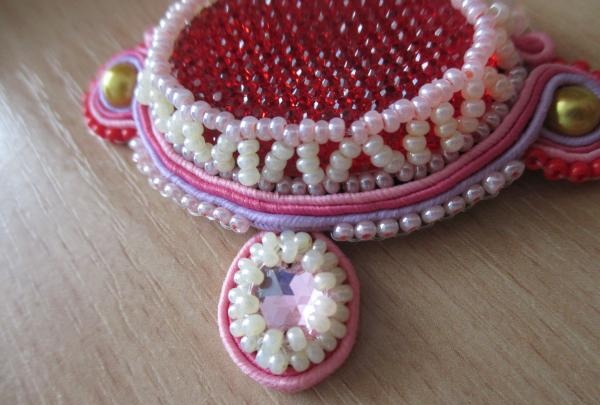
7. We also trim the element with rhinestones with beads.
![trim with beads](https://i.washerhouse.com/images/10/1913-obshivaem-biserom.jpg)
![trim with beads](https://i.washerhouse.com/images/10/1914-obshivaem-biserom.jpg)
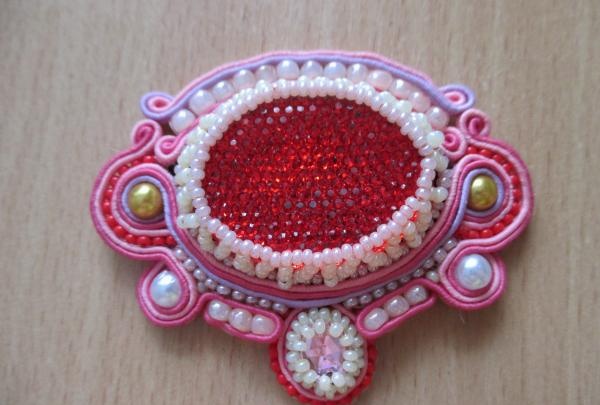
8. We make descending curls from the side beads with mother-of-pearl beads. We try to sew all the curls together so that they don’t diverge later.
![Perform descending curls](https://i.washerhouse.com/images/10/1915-vypolnyaem-snishodyaschie-zavitki.jpg)
9. We fill the remaining space with three large beads, while we wrap them around them with soutache.
![Perform descending curls](https://i.washerhouse.com/images/10/1916-vypolnyaem-snishodyaschie-zavitki.jpg)
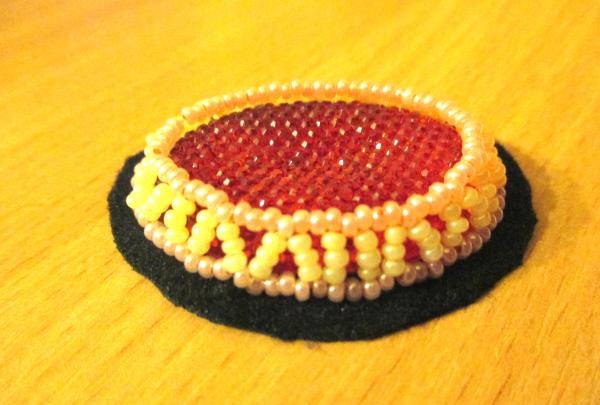
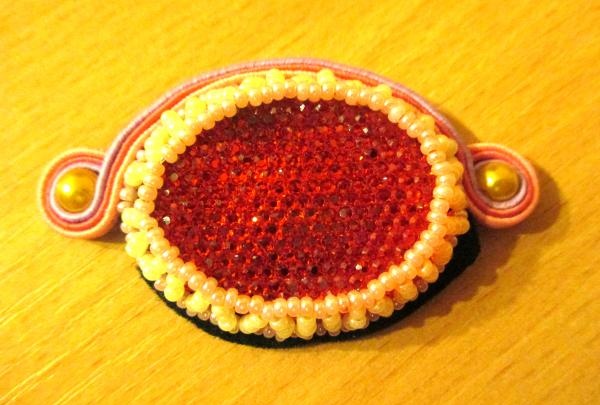
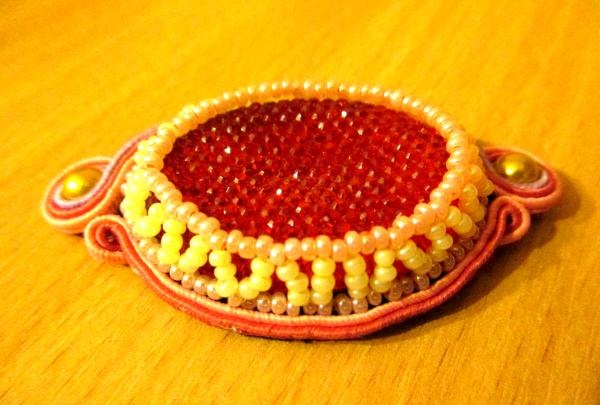
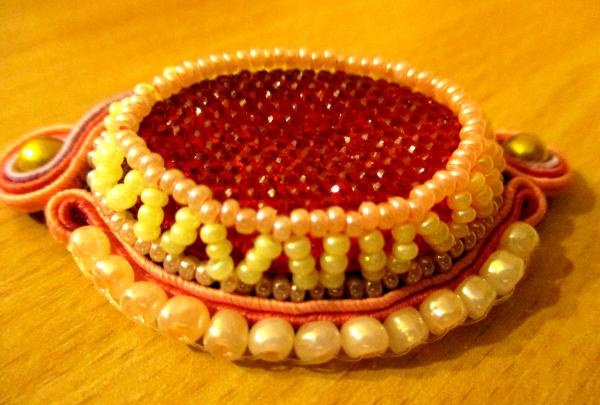
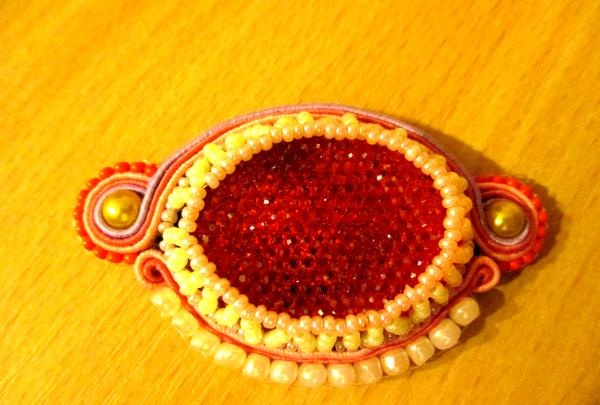
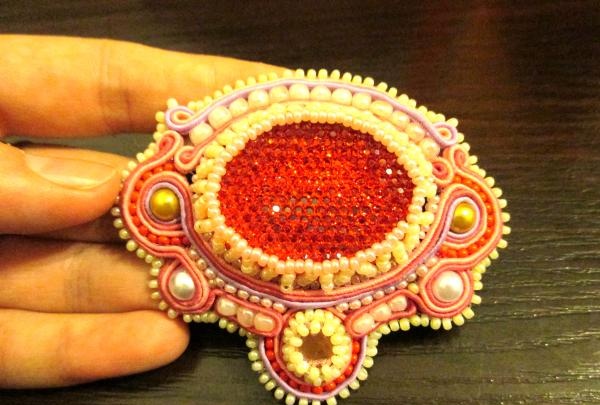
This is what you should end up with:
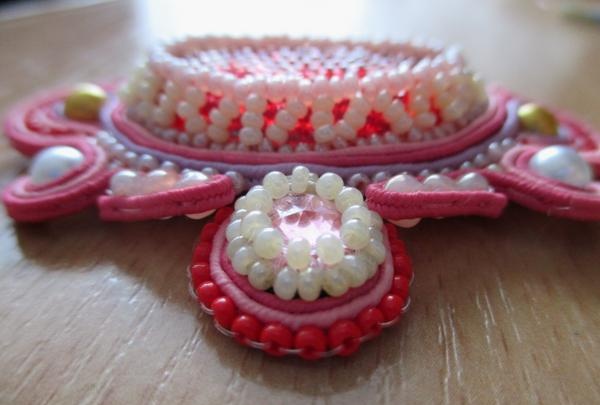
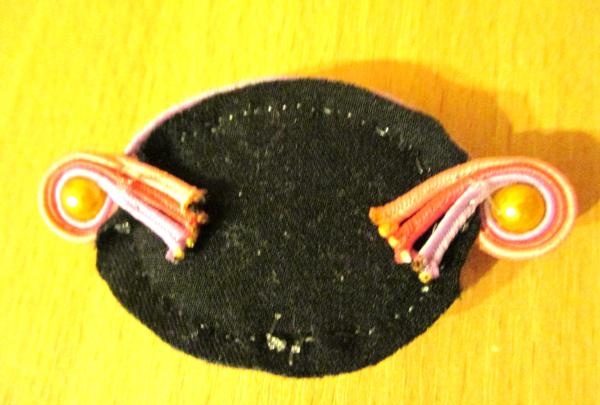
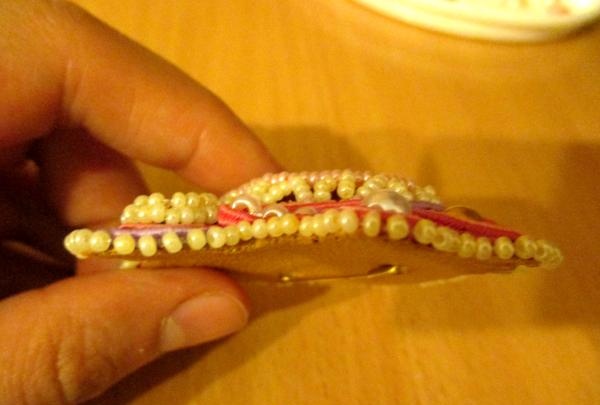
![it will work out in the end](https://i.washerhouse.com/images/10/1917-poluchitsya-v-itoge.jpg)
![it will work out in the end](https://i.washerhouse.com/images/10/1918-poluchitsya-v-itoge.jpg)
![it will work out in the end](https://i.washerhouse.com/images/10/1919-poluchitsya-v-itoge.jpg)
Wrong side:
![Wrong side](https://i.washerhouse.com/images/10/1920-iznanka.jpg)
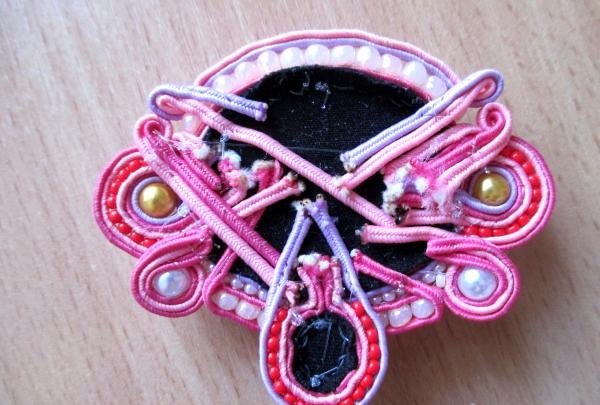
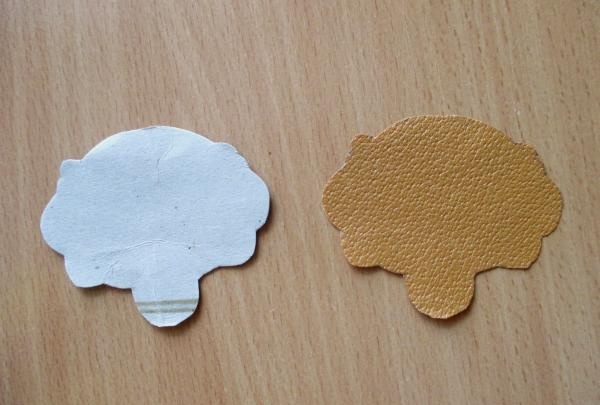
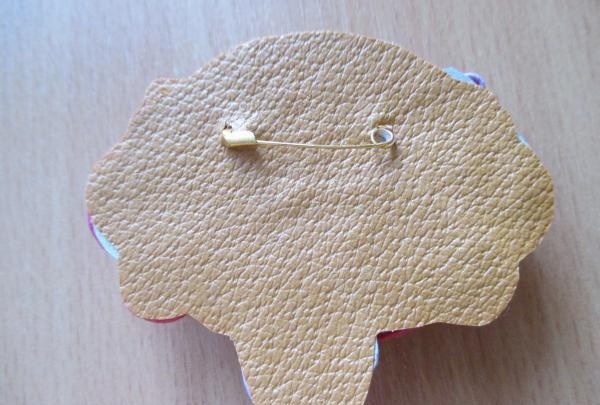
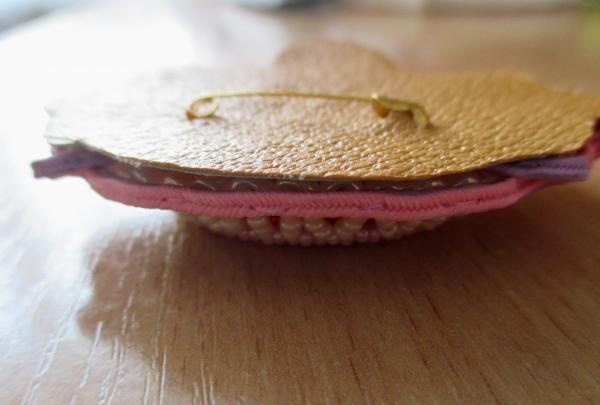
10. We outline the product with a pencil and cut out an element from thick cardboard. We cut the same element, only a little larger in size, from leatherette.
![we also cut from leatherette](https://i.washerhouse.com/images/10/1921-vystrigaem-i-iz-kozhzama.jpg)
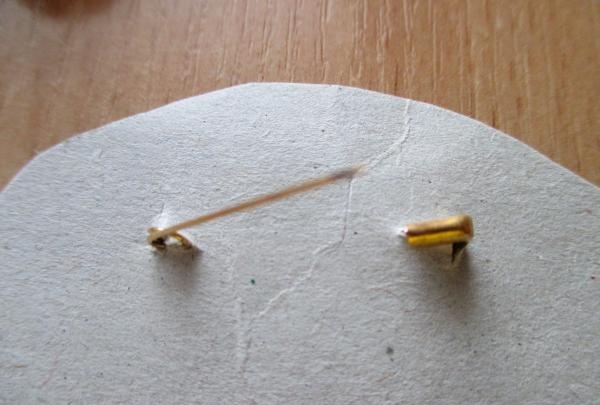
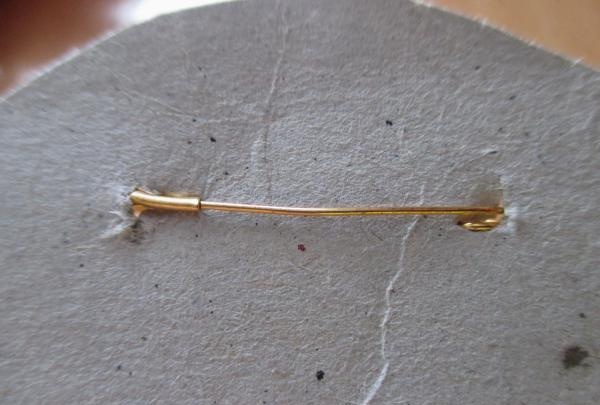
11. We insert the pin, first into the cardboard, and after gluing it to the brooch and into the leather part. By the way, we also glue leatherette. We put all this under the press and wait for the glue to set.
![Brooch Mischief](https://i.washerhouse.com/images/10/1922-brosh-ozornica.jpg)
![Brooch Mischief](https://i.washerhouse.com/images/10/1923-brosh-ozornica.jpg)
![Brooch Mischief](https://i.washerhouse.com/images/10/1924-brosh-ozornica.jpg)
12. We begin processing the edge of the brooch. We take small beads and sew them to the product using a simple overcast stitch.
![Brooch Mischief](https://i.washerhouse.com/images/10/1925-brosh-ozornica.jpg)
![Brooch Mischief](https://i.washerhouse.com/images/10/1926-brosh-ozornica.jpg)
![Brooch Mischief](https://i.washerhouse.com/images/10/1927-brosh-ozornica.jpg)
![Brooch Mischief](https://i.washerhouse.com/images/10/1928-brosh-ozornica.jpg)
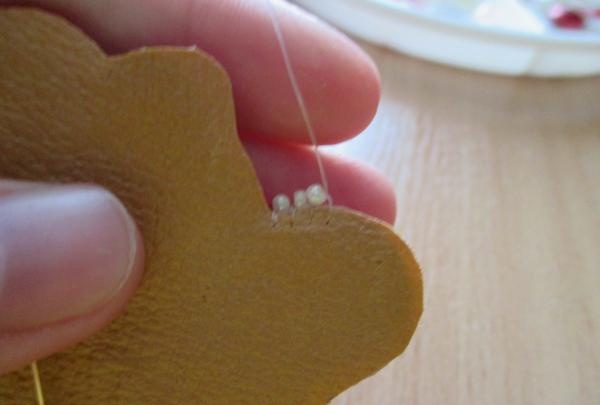
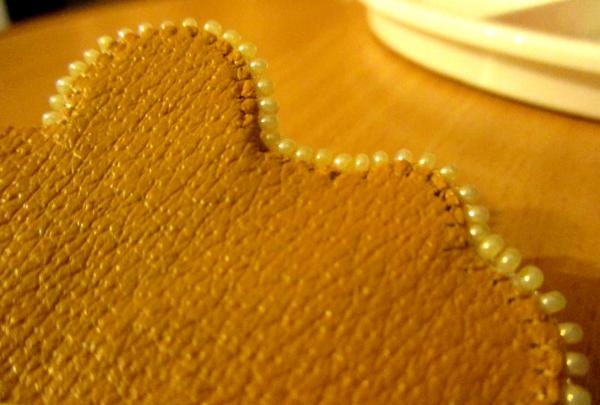
At the same time, all layers are perfectly fixed, and the edge comes out neat and beautiful.
So our “Naughty Girl” brooch is ready.
![Brooch Mischief](https://i.washerhouse.com/images/10/1929-brosh-ozornica.jpg)
![Brooch Mischief](https://i.washerhouse.com/images/10/1930-brosh-ozornica.jpg)
![Brooch Mischief](https://i.washerhouse.com/images/10/1931-brosh-ozornica.jpg)
Try to sew such a brooch yourself using my master class, and you will definitely succeed! Good luck!