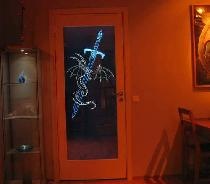
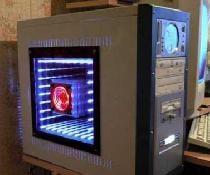
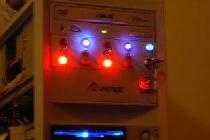
Do it yourself
Life hacks, master classes, useful tips, recipes.
home » Computer homemade products » Modding » Modding system game "Endless Void"

The idea of ​​this modding was the desire to create the effect of a visually empty body, a kind of illusion of endless emptiness.
The design consists of two parallel mirrors, one of which is translucent, like in a laser cavity. If you place a light source between these mirrors, you create a very beautiful effect of an illuminated tunnel stretching into the distance. That’s what was done - 36 super-bright LEDs were installed between the glasses. LEDs and a fan with light for beauty and cooling of the cabinet space.
To create such a device, you will need to make several glasses. The front glass is translucent; French-made Reflekta glass is excellent. You need to look for it in mirror workshops. Its appearance can be seen in the figure.
This is the drawing from which the mirror glass was cut. In the middle there is a hole for the cooler.
This photo shows a mirror with LEDs installed and a cooler screwed on.
It is quite difficult to cut a rectangular hole for the cooler...Shops refuse to do this, and I spent quite a lot of time cutting through it with a drill and a diamond bur. It is also difficult to make a large number of holes with a diameter of three millimeters under LEDs. I do not give the dimensions of the holes for the cooler, since you can use any one, or you can do without it at all, the effect will not be reduced. When you solve the problems with the glass, proceed to cutting out a window in the cover of the system unit. It is worth noting that my entire structure is shifted to the rear. This is due to the fact that the mirrors require about twenty millimeters of space, and in the front there is a compartment for hard drives and a CD-ROM. The cut window and its markings are presented in the figures below.
Diodes can be of any color, but they must be super bright. They need to be inserted from the side of the mirror and fixed with hot glue from a gun.

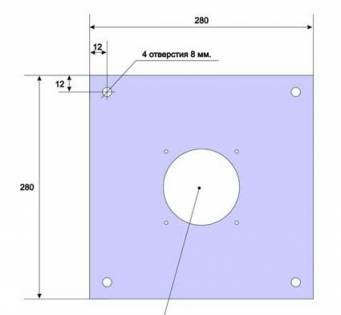
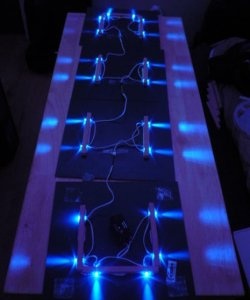
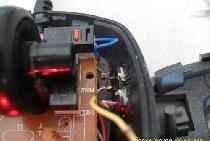
Then, using a hinged installation, connect them in parallel, with each Light-emitting diode you need to install your ballast resistor with a resistance of 820 Ohms as shown in the figure.

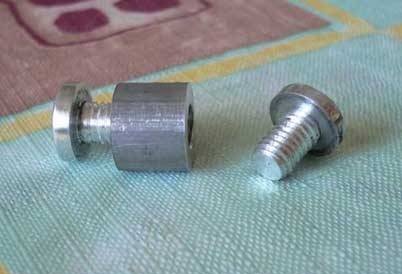
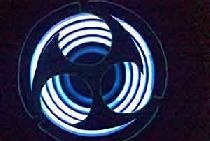
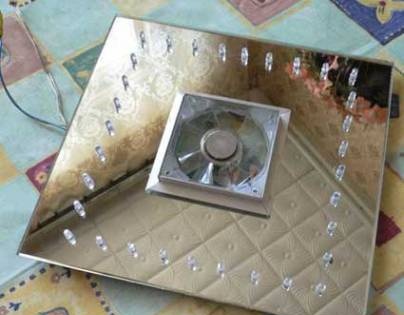
Next you will need to make threaded bushings with screws. A screw with an M6 thread, or any other, which is not important... and the length of the sleeve is 10-12 millimeters.

In fact, the depth of the tunnel directly depends on the distance between the mirrors. Everything is limited only by the free space in the case. Assembly is carried out in accordance with the drawing and is not difficult. I also recommend covering the sides of the cooler so that it is not reflected in the mirror and does not spoil the picture. The cooler can be covered with a decorative overlay and a protective mesh, as in Figure 14. The finished product should look like the last figure. I hope you like it.

The threaded bushing was turned on a lathe, which is not at all necessary. It is enough to choose bolts with a beautiful head.

Assembly drawing. It is recommended to place cardboard washers under the caps to reduce the risk of glass breaking.

The fan grille is standard, from the power supply. I made the frame myself from stainless steel.


Writes: Afanasiev Valery
come back
Comment
  • bowtiesmilelaughingblushsmileyrelaxed relaxedsmirk
    heart_eyeskissing_heartkissing_closed_eyesflushedrelievedsatisfiedgrin
    winkstuck_out_tongue_winking_eyestuck_out_tongue_closed_eyesgrinningkissingstuck_out_tonguesleeping
    worriedfrowninganguishedopen_mouthgrimacingconfusedhushed
    expressionlessunamusedsweat_smilesweatdisappointed_relievedwearypassive
    disappointedconfoundedfearfulcold_sweatperseverecrysob
    joyastonishedscreamtired_faceangryragetriumph
    sleepyyummasksunglassesdizzy_faceimpsmiling_imp
    neutral_faceno_mouthinnocent
5+two=
Comments (3)
  1. slider
    #1 slider Guests January 29, 2014 09:01
    1
    Man, you're cool. Well done for being so confused, respect)))) I really liked it)))
  2. Andrey
    #2 Andrey Guests 15 February 2014 12:29
    1
    Beautiful!
    That is, semi-transparent in front, at the level of the wall, mirror in the back...
    And if you make such a shelf at the first level of reflection, so that the first row is available for folding any ...
    that is, use the void between the half-mirror and the mirror to organize sections of shelves, then it turns out that you can also put something there!
  3. 222
    #3 222 Guests 19 October 2014 14:24
    1
    Awesome! You can do it!

Grapefruit marmalade | Do it yourself

How to refill a disposable mill in 2 minutes

Do it yourself - crafts and master classes | Page 71

2 anchor sanding attachments

«Do it yourself - with your own hands» - a site of interesting homemade products made from scrap materials and items at home. Step-by-step master classes with photos and descriptions, technologies, life hacks - everything a real master or just a craftsman needs for needlework. Crafts of any complexity, a large selection of directions and ideas for creativity.

We recommend reading

Washing machine error codes